Farmware Development
Plug-Ins to expand FarmBot functionality
Alpha
Farmware should be considered experimental at this point in time. Some features may be unstable.
First-Party Farmware
Some Farmware has been created by FarmBot.io and comes pre-installed:
- Take Photo - take a photo and upload it to the web app
- Plant Detection - detect weeds
- Camera Calibration - calibrate the camera for use in Plant Detection
Installing Farmware
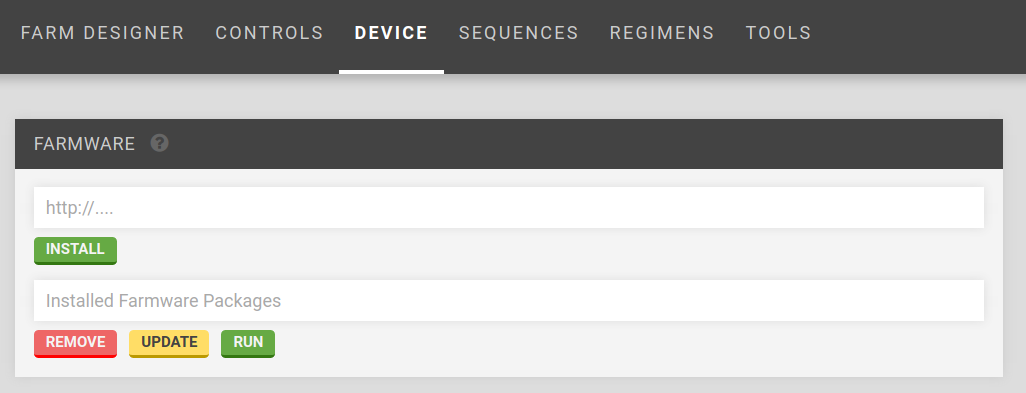
To install new Farmware, use the Farmware widget, currently located on the Device page of the FarmBot Web App. (Link to web app device page)

Installation is performed by entering the URL of the manifest.json file for the Farmware.
For example, entering https://raw.githubusercontent.com/FarmBot-Labs/farmware_manifests/master/packages/take-photo/manifest.json and clicking install would install the Take Photo Farmware, whose source code is located at the GitHub project here. See Farmware manifest for more information.
Developing Farmware
Farmwares can connect with FarmBot in the following ways:
Web App API
Use: long term information storage
Farmwares can access the FarmBot Web App API by using the token stored in the API_TOKEN environment variable. The API is used to access the database (plants, sequences, points, etc.).
GET: Python example using ‘requests’ and ‘json’:
import os
import requests
import json

headers = {'Authorization': 'Bearer ' + os.environ['API_TOKEN'],
           'content-type': "application/json"}
response = requests.get('https://my.farmbot.io/api/points', headers=headers)
points = response.json()
POST: Python API request example:
import os
import requests
import json

headers = {'Authorization': 'Bearer ' + os.environ['API_TOKEN'],
           'content-type': "application/json"}
data = json.dumps({'pointer_type': 'Plant', 'x': 100, 'y': 200})
response = requests.post('https://my.farmbot.io/api/points',
                         headers=headers, data=data)
new_plant = response.json()
Response of POST:
  "pointer_type": "Plant",
  "name": "Unknown Plant",
  "openfarm_slug": "not-set",
  "created_at": "2017-06-22T15:14:55.652Z",
  "updated_at": "2017-06-22T15:14:55.652Z",
  "meta": {},
  "radius": 50,
  "y": 200,
  "x": 100,
  "z": 0,
  "id": 101,
  "device_id": 1
Environment Variables
Use: credentials and locations
Environment variables are used to get credentials (tokens) and special locations.
Python example:
import os

API_TOKEN = os.environ['API_TOKEN']
FARMWARE_URL = os.environ['FARMWARE_URL']
FARMWARE_TOKEN = os.environ['FARMWARE_TOKEN']
IMAGES = os.environ['IMAGES_DIR']
FARMBOT_OS_VERSION = os.environ['FARMBOT_OS_VERSION']
Farmware API
Use: get information from bot (bot state)
The Farmware API can be used to get information such as position and pin status.
See FarmBotJS BotStateTree for a complete list of information available in bot/state.
(This interface replaces the Redis interface used in old FarmBot OS versions.)
Python example:
import os
import requests
import json

headers = {
  'Authorization': 'bearer {}'.format(os.environ['FARMWARE_TOKEN']),
  'content-type': "application/json"}
response = requests.post(os.environ['FARMWARE_URL'] + '/api/v1/bot/state',
              headers=headers)
bot_state = response.json()

position_x = response.json()['location_data']['position']['x']
pin_13_value = response.json()['pins']['13']['value']
Celery Script
Use: real-time web app communication and bot actions
Celery Script is JSON sent to FarmBot OS to perform actions such as device movements and setting environment variables.
Send Celery Script available actions by posting to the farmware URL (see Environment Variables).
See the Celery Script developer documentation for more information.
Python example using ‘json’:
import os
import requests
import json

send_message = {
  "kind": "send_message",
  "args": {
    "message": "Bot is at position , , .",
    "message_type": "success"
  },
  "body": [
    {
      "kind": "channel",
      "args": {
        "channel_name": "toast"
      }
    }
  ]
}


headers = {
  'Authorization': 'bearer {}'.format(os.environ['FARMWARE_TOKEN']),
  'content-type': "application/json"}
payload = json.dumps(send_message)
requests.post(os.environ['FARMWARE_URL'] + '/api/v1/celery_script',
              data=payload, headers=headers)
Inputs
If a Farmware requires inputs, an input form can be added to the Web App Farmware page by adding the config field to the manifest:
Form Building:
 "package": "Farmware Name",
  . . .
  config: [
    {name: 'key', label: 'Input Name', value: 10}
  . . .
]

Values are available to a Farmware via environment variables prefixed with the Farmware name, e.g. farmware_name_key for the above example. The default value in config is provided if no change has been made to the Web App Farmware input form.
Using inputs:
import os

VALUE = os.environ['farmware_name_key']
Currently supported languages and packages
- Python: opencv, numpy, requests
Farmware manifest
To install a Farmware, you need to create a manifest.json file and host it.
Farmware Manifest Example:
 "package": "take-photo",
 "language": "python",
 "author": "Farmbot.io",
 "description": "Take a photo using a USB or Raspberry Pi camera.",
 "version": "1.0.0",
 "min_os_version_major": 3,
 "url": "https://raw.githubusercontent.com/FarmBot-Labs/farmware_manifests/master/packages/take-photo/manifest.json",
 "zip": "https://github.com/FarmBot-Labs/Take-Photo/archive/master.zip",
 "executable": "python",
 "args": ["Take-Photo-master/take_photo.py"]
zip points to the hosted source code zip file. Github makes this easy: just add /archive/master.zip to the end of the GitHub repository URL, and insert <repository name>-master/ to the beginning of the script filename to run, as seen in the manifest example above.